Notice Re: Boutique/Store Website

IMPORTANT NOTICE / MESSAGE IMPORTANT - TO ORDER please send us a message to magenta.magentastyle@gmail.com. Enter the code of the stamps you want to obtain (if necessary consult the Catalogs section) specifying whether you want a wooden or cling frame, your shipping address and phone number (optional) and if you have questions we will answer them. Thank you for your collaboration.

POUR COMMANDER svp nous faire parvenir un message à magenta.magentastyle@gmail.com. Inscrivez-y le code des étampes que vous désirez obtenir (au besoin consultez la section Catalogues) en spécifiant si vous désirez une monture en bois ou en cling (repositionnable), votre adresse et numéro de téléphone (facultatif) et si vous avez des questions nous y répondrons. Merci de votre collaboration.

Friday 29 March 2013

Gabarit d'enveloppe à décorer / Make your own envelope with a template

Dans la dernière collection de produits Magenta, il y a des gabarits d'enveloppes.
Un petit outil formidable pour personnaliser et coordonner vos enveloppes.

In Magenta's latest collection, you can find envelopes templates.
A wonderful little tool to make unique coordinated envelopes.


Voici un petit démo bien simple pour illustrer son utilisation :
Here a little demonstration on how to use it :


Tout d'abord coupez et pliez un papier à motifs ou d'un cardstock selon les dimensions du gabarit.

First cut and fold a motif paper or a cardstock using the template.


Ensuite décorez la face du dessus de votre enveloppe selon votre imagination,
Pour ma part j'ai utilisé des pan pastel.

Next you decorate the top of your envelope using your imagination,
on my end I used pan pastel.


Ensuite collez les bords de l'enveoppe avec du tape double face.

Then glue the side of the envelope with double-face tape.


A l'intérieur, une carte entièrement coordonnée 3D :

Inside a coordinated 3D card :


Bon amusement!
Have fun!

Fabienne @ Loustic - DT Magenta

Tuesday 26 March 2013

Carte avec de la dimension / 3D card

Bonjour, aujourd'hui, je vous présente une carte avec de la dimension.

Hi, today I'm presenting you a 3D card.


J'ai étampé mon image 2 fois, je les ai découpé et coller une par-dessus l'autre avec des collant 3D. Le papier jaune avec une fenêtre découpée à la grandeur de mon étampe est adossé sur un papier rouge collé avec les collants 3D sur le gris.

I stamped my image 2 times, I cut them out and glued them one over the other with 3D adhesive. The Yellow paper with a window shaped to outline my stamp is glued on a red paper that I installed with 3D Adhesive on the grey one.


 Mes feuillages sont aussi une étampe découpée et superposée en 3D. J'ai terminé avec des chipboards de papillons, une jolie clôture et des décorations de fleurs et autres.

My folliage is also a stamp cut out and mounted with 3D adhesive. I finished up with chipboards : butterflies, a cute little fence, some flower decorations and other embellishments.


 Et pour terminer une petite carte pour dire merci à la personne qui a pris soin de mes animaux durant une fin de semaine avec une étampe du dernier catalogue.

And here's another card I made to say thank you to the person who watched over my pets for a weekend with a stamp from the latest catalog.


Bonne journée!!!
Have a good day!!!

Edith Racine - DT Magenta

Monday 25 March 2013

Reminder / Rappel


Reminder March Challenge : Sketch
You have till March 28, to participate to the Challenge!
You can enter the challenge here

Rappel Défi de Mars : Sketch
Vous avez jusqu'au 28 Mars pour participer au défi!
Vous pouvez participer ici

Wednesday 20 March 2013

Magenta Design Team Takes on the Sketchy Challenge / L'équipe DT Magenta relève le Sketchy Challenge

Have you seen Canadian Scrapbooker Magazine's Sketchy Challenge? It is a monthly sketch challenge that they host on their site.  This month, some of the Magenta Design Team took on the March sketch created by Sue Sykes.

Avez-vous vu le Sketchy Challenge Canadian Scrapbooker Magazine's? C'est un défi mensuel qui est présenté sur leur site. Ce mois ci, certaines DT Magenta on décidée de relevé le "March sketch" créé par Sue Sykes.
Here are our Magenta DT takes:
Voici l'interpretation de nos DT Magenta:


Agnieszka Ballaidea


Cassandra DeGrace


Edith Racine

I hope we have inspired you.  So go grab some of your Magenta supplies and give the Canadian Scrapbooker Magazine's Sketchy Challenge a try.  For a chance to get published, be sure to post your project in their gallery here.

J'espère que nous vous avons inspiré. Allez attrapez vos produits Magenta et essayer le défi sketch du Canadian Scrapbooker Magazine's. Pour une chance d'être publié, n'oubliez pas d'aller mettre votre projet dans leur gallerie ici.

aka Scrap Savvy - DT Magenta

Tuesday 19 March 2013

Stamped Canvas / Toile étampée

It's Bellaidea today.
I have so much fun with Magenta I try to add it to more projects then just my DT work.
I had a chance to work on new Berry 71 Bleu project last week and I wanted to use some stamps on my canvas too. I have a big selection of stamps but new Magenta were just perfect for this one.
With a help from embosing powder and some inks I created a background for my photo.

Bonjour ici Bellaidea
J'ai tellement de plaisir avec Magenta que j'essais de l'ajouté a mes projets au delà de mes devoirs de DT. J'ai eu la chance de travailler sur le nouveau projet Berry 71 Bleu la semaine dernière et je voulais utilisé quelques étampes sur mon canvas. J'ai une grande variété d'étampes mais mes Magenta était simplement parfaites pour ce projet. Avec l'aide de poudre à embosser et d'encre, j'ai créé un fond pour ma photo.


It's one of my fav stamps those days but I will sugest you to visit THIS PLACE
to see many wonderful stamps you can create your background with.
Have fun creating!

J'ai utilisé la Bordure de Papillons décoratifs.
C'est l'une de mes étampes préférés dernièrement mais je vous sugère de visité cet ENDROIT pour voir encore plus d'étampes magnifiques avec lesquelles vous pouvez créé des fonds.
Amusez-vous à créé!

Bellaidea - DT Magenta

Monday 18 March 2013

Carte gâteau! / Cake card!

Voici une carte de fête tout simple que j'ai créé avec les nouvelles étampes de Magenta


Here's a very simple birthday card I created with new Magenta Stamps
(sentiment stamp used is also available in english, link below)

Josée Gingras - DT Magenta

Sunday 17 March 2013

Happy St. Patrick's Day!/ Joyeux le Jour de St. Patrick


May the luck of the day of green be yours!

Que la chance soit avec vous en cette journée verte!


Magenta products used/ Produits Magenta utilisés :


ME209 Spring Rhapsody - 10 sheets      ME210 Robin's Nest - 10 sheets      ME212 Spring Tapestry - 10 sheets     ME215 Delicate Posies - 10 sheets   ME216 Peacock Blue - 10 sheets     CB638 - Mini Alphabet


aka Scrap Savvy - DT Magenta

Thursday 14 March 2013

Up your Stamping with a Touch of Glitter / Rehausser vos étampes avec une touche de brillant

Cassandra here today sharing a pair of Clean & Simple style cards.  A great way to take your C&S cards up a notch is by adding touches of glitter.  On the first one, I played with a blue gelato watercolour crayon which gives such rich vibrant colour.  The crayon is rather chunky, so I carefully coloured a centre area and then used the brush side of a blending pen to carry the colour to the lines and into the snowflakes.  I then added a bead line of glitter along the blue at the top of the cave and a dab on each blue snowflake.  It gives just the right touch of bling to give a snow sparkle effect. 

Bonjour, ici Cassandra qui vient partager des cartes dans le style "Clean & Simple". Une belle façon de rehaussé vos cartes "C&S" est d'ajouter un peu de brillance. Sur la première j'ai jouer avec un crayon gelato bleu qui donne une couleur vibrante. Le crayon est plutot épais, donc j'ai délicatement coloré une zone centrale et ensuite utilisé le côté de la pointe d'un "blending pen" pour ammener la couleur jusqu'au bord et dans les flocons. Cela done la touche parfaite pour avoir un effet flocons scintillant.


Magenta products used / Produits Magenta utilisés :
Snowy Nights Slumber / Ours endormi - 42.134.N
Life is difficult, nap hard. / Anglais seulement - 07.732.G


On the second card, I created a light blue shadowing in the same family of the patterned paper using a watercolour pencil crayon.  I did the ground base and around the sentiment and on the top sides of the rounds of each level of the snowman.  I blended out the colour and then applied Tim Holtz/Ranger's Rock Candy Stickles to each of the blued areas.  The rock candy dries up with a fantastique clear crystal flakes look and the touch of blue comes through. I also added Soot Stickles to the top hat to give it the bling treatment too.

Sur la deuxième carte, j'ai créé une ombre bleu légère dans les même ton que le papier utilisé avec un crayon aquarelle. J'ai fait la base autour du sentiment et les côtés de mon bohomme de neige. J'ai bien estompés les couleurs et ensuite j'ai appliqué des Stickles Rock Candy de Ranger aux zones bleuté. Le Rock Candy une fois séché, devient un peu comme des flocons crystalisés et le bleu est visible à travers. J'ai aussi ajouté des Stickles Soot au chapeau pour lui donné une allure "bling".


Magenta products used / Produits Magenta utilisés :
Magic Snowman / Bonhomme de neige magicien - 42.133.L
Life is better with friends / Anglais seulement - 07.698.G
Peace / Paix - ME238


Here is a detailed photo which better shows the 3D effect of the card.

Voici une photo de près qui montre mieux l'effet 3D de la carte.


Just those little touches of glitter gives you clean and simple with class.

Ces quelques touches de brillant voud donne du "Clean & Simple" avec classe.


 DT Magenta

Tuesday 12 March 2013

Reminder / Rappel


Reminder March Challenge : Sketch
You have till March 28, to participate to the Challenge!
You can enter the challenge here

Rappel Défi de Mars : Sketch
Vous avez jusqu'au 28 Mars pour participer au défi!
Vous pouvez participer ici

Boîte cadeau / Gift Box

Voici une boîte de bois du magasin d'escompte que j'ai décoré pour offrir à une amie.  J'ai tout d'abord peinturé la boîte et j'ai choisi de recouvrir le fond et le tour avec le papier Vol de rêve de la collection Tout en douceur.  J'ai ensuite ajouté pierres, dentelles fleurs etc ainsi que divers chipboards Magenta pour enjoliver la finition.

Voila un projet tout simple et agréable à faire autant qu'à offrir!


Here's a box from a dollar store that I decided to decorate as a gift to a friend. First I painted the box and covered the bottom with the paper Dream Flight from the Color me Softly collection. After that I added stones, lace, flowers and various Magenta Chipboard as a finishing touch.

Here's a simple project as fun to make as it is to give!


Pascale Plourde - DT Magenta

Friday 8 March 2013

Happy Women's Day / Joyeuse Journée de la Femme

Happy Women's Day
to every single one of you!

Joyeuse Journée de la Femme
à chacune d'entre vous!
One is not born a woman: one becomes one.
On ne naît pas femme : on le devient.
- Simone de Beauvoir

Wednesday 6 March 2013

Oiseau sur la branche / Bird on branch...


Voici une carte toute simple mettant en vedette la toute nouvelle étampe
Oiseau sur la branche / Bird on branch
que j'ai embossée avec la poudre à embosser noir de Ranger
et mise en couleur aux Copics.


Here's a very simple card featuring the brand new stamp
I embossed it with Ranger's black embossing powder
and colored it using Copics.


convenait parfaitement à ma carte.

The gorgeous paper "Peace" from the Emotions Collection
was perfect for my card.


En arrière-plan, j'ai utilisé un des pochoirs
avec de la pâte à embosser.

For the background, I used one of the stencil
with embossing paste.


J'espère vous avoir inspiré!

I hope this inspired you!

Manon Couture @ Kasimodo
Dt Magenta

Monday 4 March 2013

4 princesses / 4 Princess


Pour faire suite aux chroniques de mes consoeurs, je vous présente les détails de ma création que j'ai réalisée avec les poupées ''Mixed Media'' en carton aggloméré, une magnifique nouveauté chez Magenta.

To follow my colleagues post, I present you the details of my creation made with the Chipboard Mixed Media Dolls, a wonderful new products from Magenta.


CB31- Poupées ''Mixed Media'' / Mixed Media Dolls

Comme support à mon projet, j'ai utilisé une toile en canevas 12 po X 15 po. ainsi que les 4 différentes poupées en carton aggloméré.

To support my project, I used a 12" x 15" canvas and all 4 Chipboard Dolls.


Plusieurs autres formes de carton aggloméré ont servies à mon projet venant des produits suivants :

I used a lot of other chipboard shapes on my project from the following products :

CBS123 - Oiseaux / Birds
CB1212 - Bordures victoriennes / Victorian Borders
CBS122 - Papillons / Butterflies
CB651 - Clés et serrures / Keys & Locks
CB644 - Libellules / Dragonflies
CB663 - Tic Tac Toe (coeurs) / Tic Tac Toe (hearts)


Je désirais ''camoufler'' le tour de ma toile : j'ai utilisé du washi tape s'harmonisant aux couleurs de celle-ci.

I wanted to "hide" the edge of my canvas : I used washi tape that was coordinated to the colors I had picked.


Afin d'ajouter un peu plus d'éclat et de dimensions à ma création, j'ai ajouté des papillons et des fleurs cabochons que j'ai réalisés à la main. J'ai aussi travaillé avec de la cordeline afin de recréer de jolies volutes.

To add a little more punch and dimension to my creation, I decided to add butterflies and flowers that I previously made by hand. I also worked with strings to make swirls


Les médiums utilisés pour donner une touche magique à cet univers enchanteur sont les suivants : peinture Silks, Inka Gold, encre Archival, gesso, gel médium.

I used the following Mediums to give a little magic touch to this magical univers :
Silks Paints, Inka Gold, Archival Ink, Gesso, Gel Medium.


Je vous recommande fortement ce nouveau produit Magenta que sont les poupées ''Mixed Media''.

I highly recommend you these new Chipboard Mixed Media Dolls from Magenta.

Carrie Boissonneault @ Cappucine1978
DT Magenta

Sunday 3 March 2013

Ce qui donne des ailes... / What gives wings...

Allô, Voici ma toile faite avec un chipboard de poupée.

Hi, So here's my canvas created with a Doll Chipboard.


 Pour commencer, j'ai peinturé ma toile en blanc et avant que le tout ne soit sèche j'ai vaporisé du smooch pour faire voyager l'encre sur la peinture de gauche à droite. En attendant que ça sèche j'ai modifier mon chipboard. Peinturé en blanc et je l'ai habillé de papier (Collection Magenta Tout en douceur) et avec un crayon brun et de l'encre, j'ai fait la finition. Rosi les joues, coller un peu de pierres et étamper des oiseaux. Les ailes proviennent d'un papillon que j'avais acheté dans un magasin d'escompte.

First, I painted my canvas in white and before it dried I vaporized smooch so the paint would travel from left to right. While it was drying I modified my chipboard. Painted it in white and dressed it up with paper (Color me Softly Magenta Collection). With a brown pencil and ink, I added finishing touch. Gave it pink cheeks, glued a few stones and stamped birds. The wings come from a butterfly I had bought at a dollar store.


Avec de la versamark j'ai étampé une bordure de papillons et j'ai passé de la poudre à reflet doré. Ce qui fait qu'ils sont discrets mais attire la lumière.

With Versamark I stamped a Butterflies border and I used golden powder on them, which makes them discrete but brings in light.


Je me suis servie aussi de l'étampe de bourgeons. Un truc pour étamper sur la toile: laisser l'étampe à plat sur la table et tourner la toile dessus. Ensuite, avec un plioir (bone folder) appuyé la toile sur l'étampe.

I also used the Tranquil Buds stamp. Small tip to stamp on canvas : leave the stamp flat on the table and flip the canvas on it, then with a bone folder press the canvas on the stamp.


Les mots sont des rubs-on. Ce sont des mots qui donnent des ailes :) J'ai continué mes décos avec des fleurs, pierres, décalques, retailles de pochoirs (colorés à l'encre à l'alcool), stickles et de l'encre... j'ai collé avec de la pâte à embosser transparente. Pour terminer j'ai troué ma toile, poser des oeillets et ajouter une corde avec une breloque de coeur ailés collé avec la pâte. Sur ce, je vous invite à vous défouler sur une toile en vous laissant inspirer par ces poupées de cartons ou ses pochoirs en 12 X 12 ou les pochoirs en 6X6...

The words are rub-ons. It's words that give wings :) I kept decoring with flowers, stones, rub-ons, Templates cut out (colored with alcool inks), stickes and ink... I glued everything with clear embossing paste. Finally I punched my canvas, placed eyelets, added a string with a winged heart ornament. On this note, I invite you to also let it out on a canvas, let those chipboard dolls or these 12 X 12 template or these 6X6 templates...

Bonne Création
Happy Crafting

Edith - DT Magenta

Saturday 2 March 2013

Black & White Mixed Media Dolls / Poupées "Mixed Média" Noir et Blanc


Hi everyone!
I'm here today for the curious who'd want a little more details about the piece I made that was presented  earlier this week about the Magenta Mixed Media Dolls Chipboard.

Bonjour tout le monde!
Je suis ici aujourd'hui pour les curieux qui voudraient plus de détails sur la création que j'ai fait et qui a été présenté plus tôt cette semaine dans une publication sur les Poupées Mixed Média Magenta en "chipboard".


First I had to prepare my background I picked an unconventional size of cardstock for my base it's about 6" x 17". On that Beige Cardstock I centered a piece of black cardstock with the top and bottom side unevenly torn off. I covered most of the Beige Cardstock with Gesso, I textured the background using my brush, Stamps & Paper Towels, using Gesso only and NO Inks, that'll come later. On the bottom right corner I used my geometric stencil and modeling paste to give it more dimension. I've set it aside to dry.

Tout d'abord j'ai dû préparé mon fond, j'ai choisi un format de carton non-conventionnel pour base, il mesure environ 6" x 17". Sur ce carton beige j'ai centré un morceau de carton noir duquel j'ai déchiré grossièrement le haut et le bas. J'ai couvert la majorité de mon carton beige avec du Gesso, j'ai texturé le fond en utilisant mon pinceau, des étampes et des essuis-tout, utilisant du Gesso seulement, PAS d'encres, cela viendra plus tard. Dans le coin inférieur droit j'ai utilisé mon pochoir géométrique et de la pâte de modelage pour lui donné plus de dimension. Je l'ai mis de côté pour sèchage.


41.060.I - Texture with Circles / Texture de ronds

42.118.M - Distressed Diamond Background / Fond aux losanges


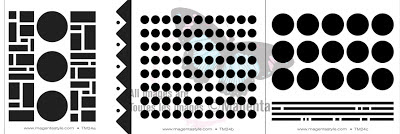
TM24 - Geometric Trio Stencil / Pochoir Trio géométrique

While everything was drying I prepared my piece of interest, the Mixed Media Doll. I simply colored it using a Sepia Black Ink Pad. I used Gesso to stamp my Text on it and with a small paint brush I doodled around the Doll chipboard shape with Gesso again.

Pendant que mon fond sèchait j'ai préparé ma pièce la plus importante, la poupée Mixed Média. Je l'ai simplement coloré avec un encreur Sépia Noir. J'ai utilisé du Gesso pour étampé mon texte sur la poupées et avec un pinceau fin j'ai gribouillé le contour de la poupée encore avec du Gesso.


CB31 - Poupées "Mixed Media"
CB31 - Mixed Media Dolls / Poupées "Mixed Média"


07.683.I - Creativity... / Créativité... (anglais)


Now that my background is mostly dry I wanted to add my secondary elements, the chandelier and the foliage (from the Montreal Chipboard). I lightly tinted the natural chipboard using my Sepia Black ink. For the foliage since the modeling paste takes longer to dry than the Gesso I was able to push it in the paste.

Maintenant que mon fond est presque sec j'ai voulu ajouter mes éléments secondaire, le chandelier et le feuillage (vient du chipboard Montréal). J'ai légèrement teinté le ton naturel du chipboard avec mon encre Sépia Noir. Pour le feuillage puisque la pâte de modellage prends plus de temps à sècher que le Gesso j'ai pu la pousser dans la pâte.


CB24 - Chandeliers Chipboard / "Chipboard" Chandeliers


CB1238 - Montreal Chipboard / "Chipboard" Montréal


I added a stripe of paper to my background, distressed the edges with a little more Gesso, I stamped my background with my Sepia Black Ink this time and I stamped my text clearly in the bottom right corner over my foliage chipboard. I added some Maruyama Mesh and Black & White Peel Off's, with my Ink pad and paper towels I distressed the edge of my piece, and finally I could glue on my doll in position!

J'ai ajouté une bande de papier à mon fond que j'ai altéré un peu avec du Gesso, j'ai étampé mon fond cette fois ci en utilisé de l'encre Sépia Noir et j'ai étampé mon texte clairement dans le coin inférieur droit au dessus du feuillage. J'ai ajouté un peu de Maruyama et des Peel Off's Noir & Blanc, avec mon encreur et des essuis-tout j'ai encré grossièrement le tour de ma création, finalement j'ai pu collé ma poupée en place!


40.133.I - Musical Score Background / Partition de musique


41.060.I - Texture with Circles / Texture de ronds

42.118.M - Distressed Diamond Background / Fond aux losanges


I hope I inspired you to create your own Mixed Media piece
using the Magenta Chipboard Dolls!!!

J'espère vous avoir inspiré a créé votre propre tableau Mixed Média
avec les poupées chipboard Magenta!!!


Valérie Dumais @lias V
Artist / Artiste - Magenta