
Hello lovely Magenta readers! Cassandra here. Gold continues to be on trend and today, I will show you how you can use stencils and gold leaf on watercolour paper with Nuances to create a background with the glitz of gold.
Bonjour charmants lecteurs de Magenta! Ici c'est Cassandra. L'or continue à être tendance et aujourd'hui, je vous montrerai comment vous pouvez utiliser des pochoirs et la feuille d'or sur le papier
aquarelle avec des Nuances pour créer un fond avec de la feuille d'or.

I gathered my supplies for gold leafing the background:
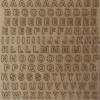
Pretty Butterfly Mask, Grid stencil, English Words stencil, 140 lb cold press watercolour paper, Cosmic Shimmer Flake and Glitter Glue, and gold leaf pieces.
J'ai rassemblé le matériel :
le masque de joli papillon, les pochoirs de grilles et des mots anglais, le papier aquarelle, la colle et des morceaux de feuille d'or.

I applied a thin layer of glue to the back of the butterfly mask and then, stamped with it on my page. I rubbed the mask to transfer the glue, and then, immediately place it in water to soak the glue off. This glue stays tacky for quite sometime, so there is no need to rush. Next, I placed and tapped the gold leaf down. Then, I rubbed the loose leaf away and brushed over the area in a circular motion with a plastic mesh body scrubber. For the stencils, I applied the glue through the stencil with my finger and then repeated the gold leafing process.
J'ai appliqué une couche mince de colle au dos du masque et j'ai ensuite tamponné ma page. J'ai frotté le masque pour transférer la colle et ensuite, je l'ai placée immédiatement dans l'eau pour enlever la colle. Puis, j'ai déposé la feuille d'or et l'ai découvert. Ensuite, j'ai essuyé la feuille volante et j'ai brossé sur la zone dans un mouvement circulaire avec un tampon de mailles en plastique. Pour les pochoirs, j'ai appliqué la colle sur le pochoir avec mon doigt et j'ai ensuite répété le processus de la feuille d'or.

This is what it looked like when I was done with the gold leafing. So pretty and glittery!
Voici ce que cela donne avec la feuille d'or. Si joli et étincelant!

Next, was adding some colours. I wet parts of the page with a water sprayer and then sprinkled on the Turquoise Nuance. As it began to do its thing, I added water with a water brush as needed. Once the blue was dry, I repeated the process in smaller areas with the Hot Pink Nuance. I love how the Nuances mixed for a pretty mauve. Once that was dry, I stamped with the Script and Postmark stamp and white ink. It did not show up the way I had wished so you will see later where I went back into the background with a grey colour ink. To finish this stage of the background, I splattered it with mixes of the Nuance colour and water for both colours.
Ensuite j'ai ajouté quelques couleurs. J'ai mouillé les parties de la page avec de l'eau et vaporisé sur la Nuance Turquoise. J'ai ajouté de l'eau avec un pinceau ou c'était nécessaire. Une fois le turquoise sec, j'ai répété le processus dans la plus petite zone avec la Nuance Rose. J'aime comment les Nuances se sont mélangées entre elles pour un joli mauve. Une fois sec, j'ai étampé avec l'étampe Écriture et cachet postal et de l'encre blanche. On ne le voit pas bien ici mais vous le verrez plus tard et j'ai aussi étampé avec de l'encre grise. Pour finir cette étape, j'ai éclaboussé avec un mélange de Nuance diluer dans de l'eau et ce pour chaque couleur.

Here, you can see where I went back and stamped with the grey ink. I also added outlining and shading to all the gold leafed areas using watercolour pencils crayons in dark grey and black. Some further embellishments, a bit of journaling on vellum, and it was complete.
Ici, vous pouvez voir où je suis retournée et ai tamponné avec l'encre grise. J'ai aussi ajouté un contour et des ombres à toutes les zones à feuilles d'or utilisant des crayons aquarelle gris sombre et noir. Quelques nouveaux embellissements, un peu de journaling sur le vélin et la page était terminée!
*****
Magenta products used:
Magenta products used:
Produits Magenta utilisés:
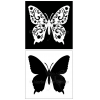 |
| TM107 - Pretty Butterfly |
 |
| TM86 - Grid |
 |
| TM98 - English Words |
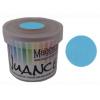 |
| Nuance - MNU001 - Turquoise |
 |
| Nuance - MNU005 - Hot Pink |


No comments:
Post a Comment