
Cassandra here today with a watercolour card made from a silhouette image. I am very excited about many of the new products as part of the Spring/Summer 2018 release. I am especially loving the new silhouette images and the possibilities that they possess.
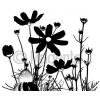
For my first creation from the collection, I made this birthday card with the Spring Silhouette Flowers using a MISTI and Zig Clean Color Real Brush markers on 4" x 6" 140 lb cold press watercolour paper.

I began by using the markers to individually colour sections and then spritz them with water before stamping onto the paper. That is the beauty of using a stamp positioning tool as you can do things with your stamped images that would be virtually impossible to do without them. I started with the yellow flowers. Then, I did the pink flowers. Next, the blue flowers and lastly, all the greens. As I transitioned between colours, I would clean off the stamp so as to not get mud. You can always go back in and repeat stamp a section until you are pleased with the colouring. I did go in and add a little brown to the echinachia centre in the end.

Once dry, I ran the green marker over a small patch of my craft mat and added some water and then used a watercolour brush to add splatters. While it was drying, I cut a piece of kraft scrap paper to 1 1/2" x 6". Using the MISTI, I stamped the Happy Birthday sentiment. Again, this was made possible because of utilizing a stamp positioning tool. I had cut the sentiment apart to that I could have the sentiment run horizontally verses its original stacked vertical positioning. I doodled in the diamonds between the sentiment repetitions.

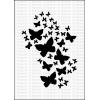
Now, I was ready to assemble the card. On a 4 1/2" x 6" cardbase, I adhered the kraft sentiment section to the bottom and then used a 4 1/4" x 5 3/4" piece of fun foam to adhere the watercolour panel at the top. Next, I adhered the two stripes of twine with one on the lower section and the other on the top edge. Lastly, I used the Flying Butterflies stencil and chose three of the smaller butterfly sizes to add the butterflies using a Stardust Gelly Roll pen to add a bit of sparkle.
I hope this tutorial gives you some ideas to expand your thinking around silhouette images and their potential for beautiful colourful creations.
*****
Magenta products used:
Produits Magenta utilisés:
Produits Magenta utilisés:

4 comments:
Beautiful card Cassandra, love it!!
This is so delicate and colorful! What a perfect way to say we are ready for Spring!
Thanks Shilpa! Addictive results with colouring this way. I couldn't stop at one. Did several with different colouring media. :)
Thank you Creatingincolors! This stamp really does say spring! :)
Post a Comment