
All of these cards were stamped the same way, just the colors vary. You will be able to stamp two cards from every application of ink to the craftsheet.
Toutes ces cartes ont été étampées de la même manière, seules les couleurs varient. Vous pourrez étamper deux cartes de chaque application d'encre sur la feuille de travail.
HOW TO:
step 1: dab 4 colors distress ink onto a craft sheet, in a square, not overlapping; the size approximately the size of the stamp.
COMMENT: étape 1: étampez 4 couleurs d'encre Distress sur une feuille de bricolage, dans un carré, sans chevauchement; la taille approximativement la taille du timbre.

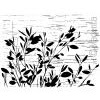
card 1 - carte 1

step 2 - mist with a little water
Etape 2 - vaporisez un petit peu d'eau

card 2 - carte 2

step 3 - put stamp in ink and turn it about 90 degrees. Stamp onto cardstock. Brush with waterbrush over background to soften the lines behind the foliage. Leave to dry. Paint white acrylic paint over the lines in the background to soften them even more. Leave to dry.
étape 3 - mettez l'étampe dans l'encre et tournez-la d'environ 90 degrés. Etampez sur du papier cartonné. Brossez avec un pinceau sur fond pour adoucir les lignes derrière le feuillage. Laisser sécher. Peignez de la peinture acrylique blanche sur les lignes en arrière-plan pour les adoucir encore plus. Laisser sécher.

card 3 - carte 3

step 4 - Finish it off by adding color with a marker with the same color of distress inks used to stamp (edges), and with watercolor pencils leaves. Also stamp some postage stamps.
étape 4 - Terminez-la en ajoutant de la couleur avec un marqueur avec la même couleur d'encres Distress utilisée pour tamponner (bords) et avec les crayons aquarelles sur les feuilles. Etampez également certains timbres-poste.

card 4 - carte 4

Ellie Knol - DT Magenta
*****
Produits Magenta utilisés:
Magenta products used:


2 comments:
Lovely!
All so pretty Ellie! I am going to get that leafy stamp. Love how you used it! :)
Post a Comment